Encrypt with a certificate
Encrypt a PDF so that only the people you choose can open it with their digital IDs, give each of them their own permissions, keep your security settings as policies, and open a document encrypted for you.
A password protects a document for anyone who knows the password. Certificate security protects it for chosen people: the document is encrypted for the certificates of its recipients, and each of them opens it with their own digital ID, without any password to share. You can also give each recipient different permissions: one may change the document, another only read and print it.
You need the certificate of each recipient: a file they send you (.cer, .crt, .der, .pem, .p7b or .p7c), or one of your trusted certificates. Your own digital ID is added for you, so that you can still open the document.

- Encrypt with certificate: choose the recipients and what each may do.
- Digital IDs: your own digital IDs, and which one is used for encryption.
- Security policies: security settings you keep, to apply in one click.
Encrypt with certificate and Security policies need Pro. Opening a document encrypted for your digital ID is free.
Encrypt a document for its recipients
- Open the document, click the Protect tab, then Encrypt with certificate. The Certificate Security dialog opens, with your own digital ID in the Recipients list, marked (you).
- Add the other recipients:
- Add from a file… reads the certificates in a file a recipient sent you;
- Add a trusted certificate lists the certificates you trust (see Digital signatures);
- Add my digital ID adds another of your own digital IDs.
- Each recipient starts with full access. To allow less, select the recipient and click Permissions… (see below).
- Choose the Compatibility (encryption level) and the Document components to encrypt, as for a password (see Encryption options).
- Click Encrypt, then save the document (Ctrl+S). The document is encrypted when it is saved.
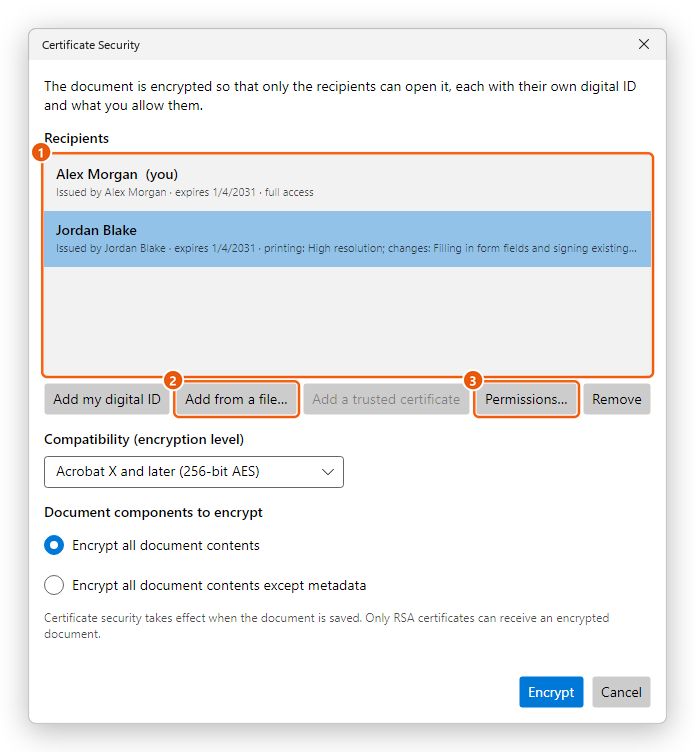
- The recipients, each with the issuer of their certificate, its expiry date and what they may do.
- Add from a file…: a certificate a recipient sent you.
- Permissions…: what the selected recipient may do.
To take someone off the list, select them and click Remove.
Only certificates with an RSA key can receive an encrypted document; the dialog says so when a certificate cannot. If you take your own digital ID off the list, the editor asks first: once the document is saved and closed, you could not open it again. A signed document cannot be encrypted, as encrypting would break its signatures: encrypt it before you sign.
Encrypting with certificates replaces any password the document had. Until you close it, the document stays open in the editor and you can go on working on it; your changes keep the security when you save.
Give each recipient their own permissions
- In the Certificate Security dialog, select the recipient and click Permissions….
- Under Printing allowed, choose None, Low resolution (150 dpi) or High resolution.
- Under Changes allowed, choose from None to Any except extracting pages.
- Tick or untick Enable copying of text, images, and other content, and Enable text access for screen reader devices for the visually impaired.
- Click OK. The line under the recipient's name sums up what they may do.
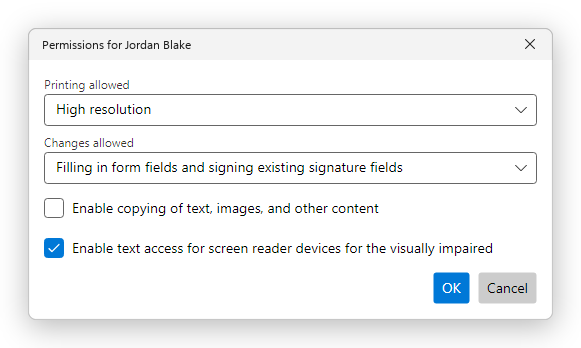
When the recipient opens the document with their digital ID, they get the permissions you gave their certificate.
Choose the digital ID used for encryption
Your own digital ID is the one marked as the default for encryption, or the first that can receive encrypted documents. To choose it, click Digital IDs on the Protect tab, select the digital ID and click Use for encryption. The same dialog creates a self-signed digital ID, adds a digital ID file, attaches the module of a smart card or USB token, and exports your certificate to a file that you can send to the people who will encrypt documents for you (Export…). See Digital signatures.
To receive encrypted documents, send your certificate, not your digital ID file: the certificate holds no private key and needs no password.
Open a document encrypted for you
When you open a document encrypted with certificates:
- if one of your digital IDs in this computer's certificate store is among the recipients, the document opens at once;
- otherwise the Open with a Digital ID dialog opens. It lists the certificates the document is encrypted for. Choose your digital ID and type its password (or the PIN of your card or token), then click Open.
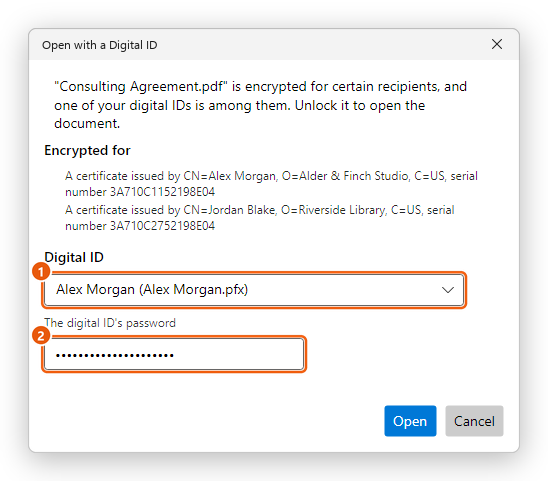
- Your digital ID. If it is not in the list, choose Another digital ID file (.pfx, .p12)… and click Browse: a digital ID file that opens the document is added to your digital IDs.
- The password of the digital ID.
If none of your digital IDs is a recipient, the dialog says so: only the people the document was encrypted for can open it.
Change or remove certificate security
- To change the recipients, click Encrypt with certificate again: the new list replaces the old one when you save.
- To remove the security, click Remove security and save the document.
- To protect the document with a password instead, click Password (see Protect a PDF with a password).
Changing or removing the security needs full access: the editor refuses it when your digital ID was given fewer permissions.
Security policies
A security policy keeps security settings you use often, with a name, so that you can apply them to a document in one step: password security (with or without its passwords), or certificate security (with its recipients, or asking for them each time).
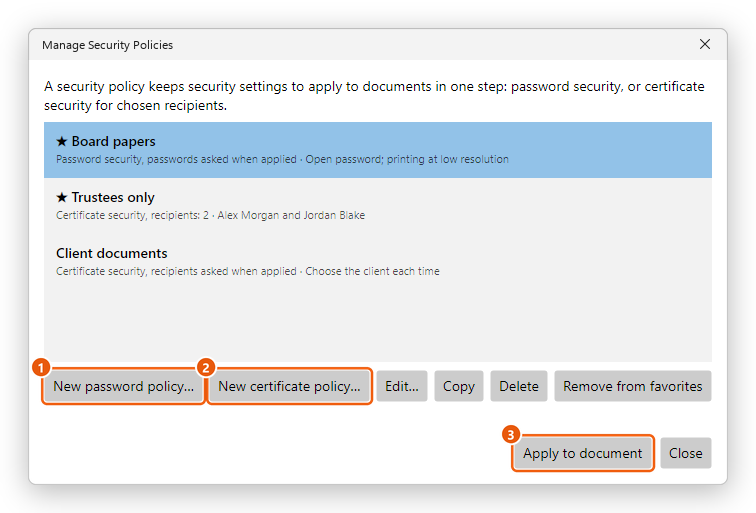
- New password policy…: the Password Security dialog, then the policy's name.
- New certificate policy…: the Certificate Security dialog, then the policy's name.
- Apply to document: protects the open document with the selected policy.
Create a policy
- On the Protect tab, click Security policies, then Manage security policies….
- Click New password policy… or New certificate policy…, and choose the settings as you would to protect a document.
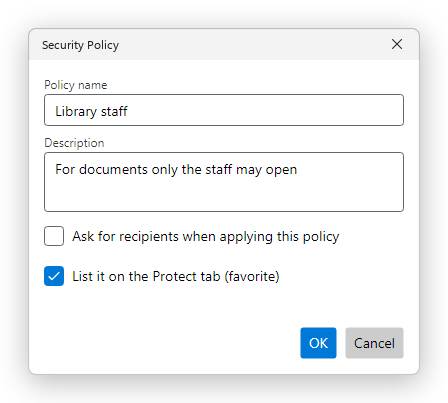
- In the Security Policy dialog, type the Policy name and a Description.
- For a password policy, tick Save passwords with the policy to keep the passwords: the policy then protects a document without asking. Left unticked, you type the passwords each time. For a certificate policy, tick Ask for recipients when applying this policy to choose the recipients each time, instead of keeping them.
- Tick List it on the Protect tab (favorite) to apply it from the Security policies menu.
- Click OK.
Saved passwords are kept on this computer, protected, with the editor's settings. A policy without saved passwords keeps only the settings.
Apply a policy
- Click Security policies on the Protect tab and choose a favorite policy from the menu; or
- in Manage security policies…, select the policy and click Apply to document.
A policy with everything it needs protects the document at once. One that asks for passwords or recipients opens Password Security or Certificate Security with its settings, for you to complete. The status bar says when the policy was applied; save the document to keep it.
Manage your policies
In Manage Security Policies, select a policy and click Edit… to change it, Copy to start a new one from it, Delete to remove it, and Favorite (or Remove from favorites) to list it on the Protect tab or take it off. Favorites show a ★ before their name.