Digital signatures
Sign a PDF with a certificate (a digital ID), add a time stamp, and check the signatures of a signed document in the Signatures panel.
A digital signature is made with a digital ID: a certificate and its private key, from a file (.pfx or .p12), from this computer's certificate store, or from a smart card or USB token. It proves who signed and shows whether the document changed after signing. This is different from signing with your handwritten signature, which only places a picture of it.
Sign with a certificate
- Open the document and click the Protect tab.
- Click Sign with certificate.
- Choose your digital ID, and type its password (or the PIN of your card or token).
- If you like, choose or type a reason, and type the place and a way to contact you.
- Click Continue.
- Drag a box on the page where the signature goes, or click for a box of the standard size.
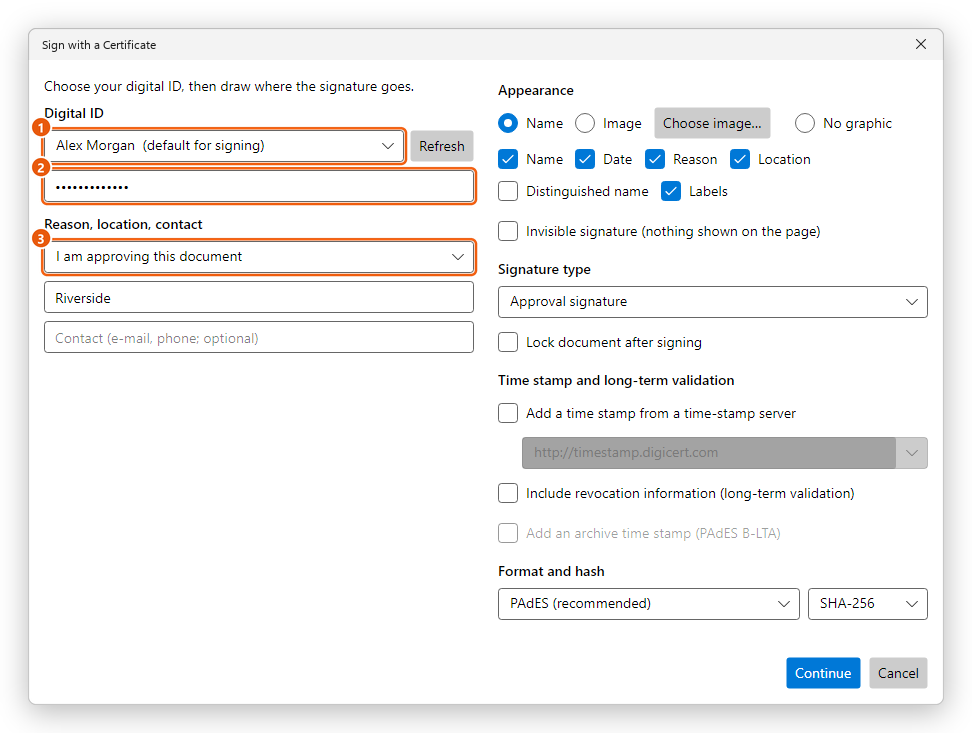
- The digital ID. The list has your digital ID files, the certificates of this computer and those of your cards and tokens. To use another file, choose A digital ID file (.pfx, .p12) at the end of the list and click Browse.
- The password of the digital ID file.
- The reason for signing, for example I am approving this document.
The document is signed, and the Signatures panel opens to show the new signature. Save the document (Ctrl+S) to keep it.
A signed document can still be changed, but every change is added after the signature, and the Signatures panel lists it. Make all your changes before you sign.
Signing with a certificate and adding time stamps need Pro. Checking the signatures of a document is free.
Signature options
The right side of the dialog sets how the signature looks and what it allows. The editor remembers most of these choices for next time.
- Appearance: the signature box shows your Name, an Image (click Choose image) or No graphic, with the details you tick: Name, Date, Reason, Location, Distinguished name and Labels. Tick Invisible signature (nothing shown on the page) to sign without a box: the signature is then seen only in the Signatures panel.
- Signature type: an Approval signature is the usual one. A certifying signature, made by the document's author, says what may change after it: Certify - no changes allowed, Certify - form filling allowed or Certify - form filling and comments allowed. Lock document after signing allows no more changes after your signature, and makes the form's fields read-only.
- Time stamp and long-term validation: Add a time stamp from a time-stamp server takes the signing time from a trusted server instead of your computer's clock (choose a server in the list, or type the address of another). Include revocation information (long-term validation) stores what is needed to check the signature years from now, after the certificate has expired. Add an archive time stamp (PAdES B-LTA) adds one more time stamp over all of it.
- Format and hash: PAdES (recommended) suits today's readers; PKCS#7 (older readers) is for old software that needs it.
Your computer must be online for a time stamp and for the revocation information.
Sign a signature field
When a form has a signature field, click the field, then click Sign with ID. The same dialog opens; after Continue, the signature goes into the field.
Your digital IDs
Click Digital IDs on the Protect tab to see all your digital IDs. There you can create a self-signed digital ID, add a digital ID file, attach the module of a smart card or USB token, export a certificate to send to others, and choose the ID used for signing by default.
A self-signed digital ID is fine for trying out signing, or between people who trust each other's certificates. For signatures that others must be able to check, get a digital ID from a certificate authority.
Time stamp a document
Time stamp on the Protect tab adds a document time stamp from a time-stamp server, without signing: it proves that the document existed in this form at that time. Existing signatures stay valid.
Check the signatures of a document
Click Signatures on the Protect tab, or the Signatures icon on the right side of the window. The panel checks each signature and says what it found.
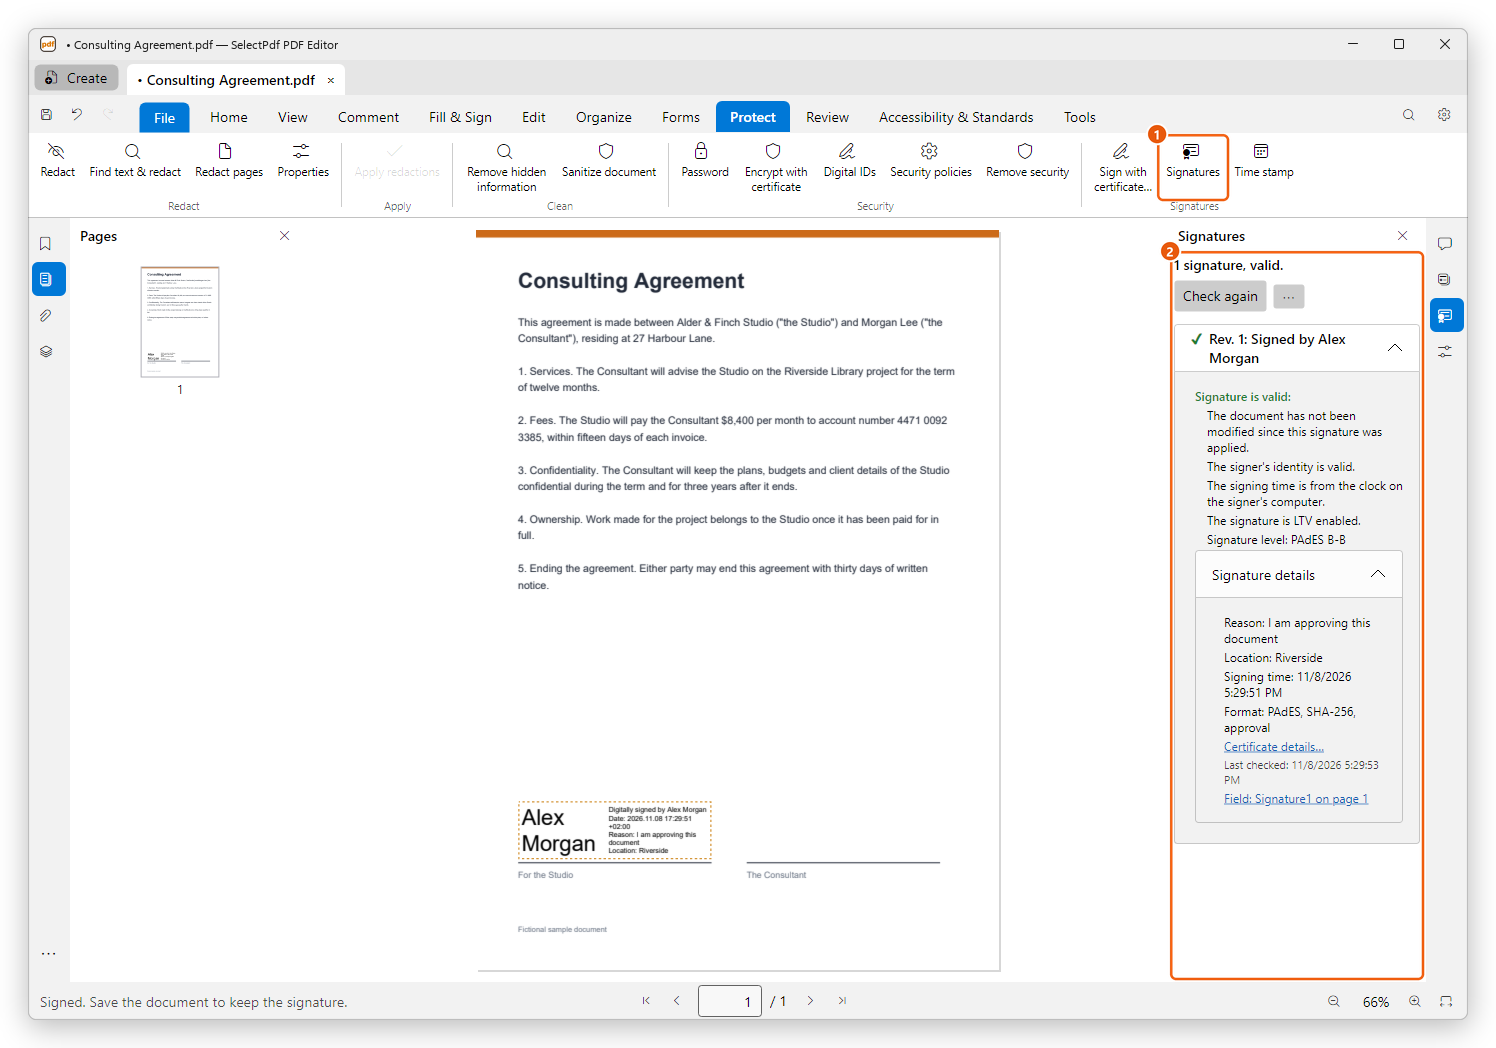
- Signatures on the Protect tab.
- The Signatures panel: one entry per signature, in the order they were made (Rev. 1, Rev. 2...).
Each signature has one of three results:
| Result | What it means |
|---|---|
| ✔ Signature is valid | The document has not changed since it was signed (or only in ways the signature allows), and the signer's identity is trusted. |
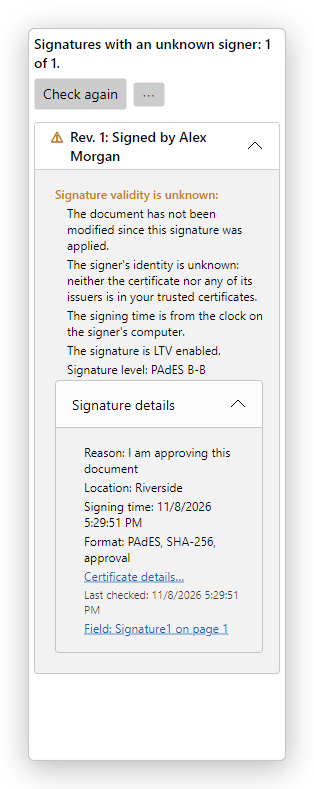
| ⚠ Signature validity is unknown | The document has not been changed in ways the signature does not allow, but the signer's certificate, or the one that issued it, is not among your trusted certificates. |
| ✖ Signature is invalid | The document was altered after signing, or changed in ways the signature does not allow, or the certificate is not valid (for example, it was revoked). |
Below the result, the panel says whether the signing time came from a time-stamp server or from the signer's computer, and whether the signature is LTV enabled (it can still be checked after the certificate expires). Signature details shows the reason, the place, the signing time and the format; Certificate details opens the signer's certificate. View signed version opens the document as it was when signed, and Compare signed version to current version shows what changed since.
Trust a signer
A signature made with a self-signed digital ID, or with a certificate the editor does not know, has an unknown validity. If you know the certificate is the signer's (for example, the signer sent it to you), right-click the signature in the panel and click Add signer to trusted certificates. The signature is checked again and shows as valid.
Click the ⋯ button of the panel (Options) for more choices: Trusted certificates lists the certificates you trust, and the options there choose which other sources the editor trusts (the root certificates of Windows, the EU Trusted Lists and the major document signing providers) and whether it checks online that certificates were not revoked. Check again checks every signature again.
Right-click a signature for its other commands, such as Show certificate, Go to signature field and Clear Signature.
Add Verification Information, which stores in the document what is needed to check a signature later, needs Pro.